I have long thought that Unity did not really support configurable input out of the box — at least not without using the ugly default Graphics/Input configuration dialog (which no polished game would ever inflict on its players). Particularly if you wanted to support hot-swappable joysticks or gamepads, I always believed you had to use some third-party plug-in.
But I recently discovered that this is not true! Making configurable, hot-swappable input in Unity can be done without any plug-ins, and it's not even all that difficult. Read on to see how.
The first key insight is that Input.GetKey isn't just for keys on the keyboard; it also works for joystick buttons. The KeyCode enum contains hundreds of entries, including not only all the keyboard keys, but also things like Joystick1Button3 and Joystick7Button12. You can use these codes with GetKey, GetKeyDown, etc., and they work just as you would want, reporting the state of any button on any joystick.
 That means that you can ask the user what key/button they want to use for any function by simply scanning all KeyCodes. It doesn't matter whether they press a keyboard key, or a button on a gamepad or joystick — it works the same regardless.
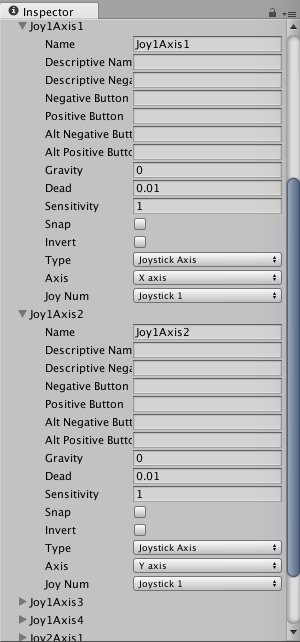
The only thing that doesn't work with this trick is analog joysticks or d-pads — which leads to our second key insight. Because these don't report as KeyCodes, we need a different approach. Here I'm borrowing a trick I noticed Rewired doing; we simply define a large number of "virtual joysticks" using the standard Unity Input Manager. These need to cover every joystick and every axis we might want to use. You're probably safe including 4 joysticks with 8 axes each, for a total of 32 inputs (though Rewired defines a lot more).
These virtual axes should be defined with a very specific naming scheme, so that you can reliably find them from code. An example of what the Input settings should look like is shown at right (click for a larger view). Then we'll simply check all such axes to see if any of them are in use.
Since there are two different ways to check for input, I defined an abstract base class with a concrete subclass for each method. First, here's the base class:
public abstract class InputElement {
	public abstract string DisplayName();
	public abstract float Value();
	public abstract string ToSaveString();

	public static InputElement FromSaveString(string saveString) {
		if (saveString.StartsWith("Key:")) return InputElementKey.FromSaveString(saveString);
		if (saveString.StartsWith("Axis:")) return InputElementAxis.FromSaveString(saveString);
		return null;
	}

	public static InputElement ScanForAnyInput() {
		InputElement result = InputElementKey.ScanForAnyKey();
		if (result == null) result = InputElementAxis.ScanForAnyAxis();
		return result;
	}
}
This defines abstract methods to get the display name and current value of any input element, as well as a "save string" which can be used to save that element out (to PlayerPrefs or your own data file or whatever). It also provides a factory method called FromSaveString, that reconstitutes an appropriate InputElement subclass based on the first part of the save string.
Finally, note the ScanForAnyInput method, which checks for both kinds of input, returning the first element it finds in use. This is the basis for user configuration; you'll prompt the user to demonstrate the input he wants to use for some game function, and then call ScanForAnyInput until it returns a non-null value.
Next, here's the concrete subclass for keys -- keeping in mind that these represent not just keyboard keys, but any joystick button as well.
public class InputElementKey : InputElement {
	public KeyCode keyCode;

	public InputElementKey(KeyCode code) {
		this.keyCode = code;
	}

	public override string DisplayName() {
		return keyCode.ToString();
	}

	public override float Value() {
		return Input.GetKey(keyCode) ? 1 : 0;
	}

	public override string ToSaveString() {
		return "Key:" + keyCode;
	}

	public static InputElementKey FromSaveString(string saveString) {
		string keyName = saveString.Substring(4);
		KeyCode code = (KeyCode)System.Enum.Parse(typeof(KeyCode), keyName);
		return new InputElementKey(code);
	}

	public static InputElementKey ScanForAnyKey() {
		foreach (KeyCode code in System.Enum.GetValues(typeof(KeyCode))) {
			if (Input.GetKey(code)) return new InputElementKey(code);
		}
		return null;
	}
}
Nothing tricky there. The only data we need is the key code, and the ScanForAnyKey method simply checks them all.
Finally, here's the other concrete subclass that handles joystick axes:
public class InputElementAxis : InputElement {
	string axis;
	float sign;

	public InputElementAxis(string axis, float sign) {
		this.axis = axis;
		this.sign = sign;
	}

	public override string DisplayName() {
		return axis + (sign > 0 ? " > 0" : " < 0");
	}

	public override float Value() {
		float val = Input.GetAxisRaw(axis);
		return Mathf.Clamp01(val * sign);
	}

	public override string ToSaveString() {
		return "Axis:" + axis + ":" + sign;
	}

	public static InputElementAxis FromSaveString(string saveString) {
		string[] parts = saveString.Split(new char[]{':'});
		float sign;
		float.TryParse(parts[2], out sign);
		return new InputElementAxis(parts[1], sign);
	}

	public static InputElementAxis ScanForAnyAxis() {
		for (int joynum=1; joynum<=2; joynum++) {
			for (int axisnum=1; axisnum<=4; axisnum++) {
				string axis = string.Format("Joy{0}Axis{1}", joynum, axisnum);
				float val = Input.GetAxisRaw(axis);
				if (Mathf.Abs(val) > 0.25f) {
					Debug.Log(axis + " value: " + val);
					return new InputElementAxis(axis, Mathf.Sign(val));
				}
			}
		}
		return null;
	}
}
This one's a little trickier, because I want to treat an axis pushed in a particular direction as an input, separate from the same axis pushed in the other direction. For example, if it's a left/right axis, we're treating "left" and "right" as two different input elements. This provides a couple of benefits: it lets us treat actual axes and a pair of buttons in exactly the same way, and it allows the user to invert the axis if they prefer, again without having to do anything special to support that.
The ScanForAnyAxis method checks all joysticks and axes in some range; for this demo, I checked the first 2 joysticks and 4 axes. In real code, you should probably define constants for those. Finally, be sure the axis names you construct in this method match the actual axis names defined in the Input editor. (I picked a name pattern that matches what Rewired uses, to make it easy to switch from that.)
With these classes in hand, configuring, storing, and detecting inputs is very easy. On startup, you would load key elements from preferences, falling back on some defaults, like so:
void LoadFromPrefs() {
	leftInput = InputElement.FromSaveString(PlayerPrefs.GetString("leftInput", "Key:LeftArrow"));
	rightInput = InputElement.FromSaveString(PlayerPrefs.GetString("rightInput", "Key:RightArrow"));
	fireInput = InputElement.FromSaveString(PlayerPrefs.GetString("fireInput", "Key:LeftShift"));
}
And whenever the user reconfigures an input, you'd save the new input elements to prefs like this.
void SaveToPrefs() {
	if (leftInput != null) PlayerPrefs.SetString("leftInput", leftInput.ToSaveString());
	if (rightInput != null) PlayerPrefs.SetString("rightInput", rightInput.ToSaveString());
	if (fireInput != null) PlayerPrefs.SetString("fireInput", fireInput.ToSaveString());
}
Obviously this demo code is using separate properties for leftInput, rightInput, and fireInput, just to keep the code simple — but if I had any more than that, I'd probably switch to using an array or map instead, so I could just iterate over all of them in a loop for tasks like this.
Finally, to actually use these inputs in your game code is easy; just call .Value() on whatever input element you need to check.
if (leftInput != null) {
	transform.position += -transform.right * leftInput.Value() * moveSpeed * Time.deltaTime;
}
if (rightInput != null) {
	transform.position += transform.right * rightInput.Value() * moveSpeed * Time.deltaTime;
}
if (fireInput != null && fireInput.Value() > 0 && Time.time > nextFireTime	) {
	FireBullet();
	nextFireTime = Time.time + 0.2f;
}
I've put this all together into a little demo package, which you should be able to import into your Unity project and try it out. (Just remember to define input elements Joy1Axis1 through Joy2Axis4, as described above.)

Download the Unity package here.
So there you have it! With very little code, this approach allows you to support user-configured arbitrary inputs, including hot-swapped joysticks and gamepads, all with no third-party plug-ins.