I've been doing a lot of development for the Oculus Go lately, which is an absolutely marvelous VR platform — inexpensive, easy to use, and high quality (when the development is done right). For the most part, developing for it in Unity is straightforward; the camera automatically tracks the rotation of the headset, and the OVRInput class provides controller tracking and touch/button inputs.
But at some point you may need to use some part of the extensive "Oculus Platform" SDK. This provides information about the current user, such as their Oculus username, and also provides all manner of match-making and social services, including efficient voice (VoIP) chat. Unfortunately, accessing this SDK isn't nearly as simple as you might expect. This post explains how to do it.
1. Add the Oculus Platform SDK.
You can get this from the Asset Store, or you can download a Unity package from here. Either way, import it into your project. Then use the new Oculus Platform menu command to access the platform settings.

You'll need to fill in the App Id from your Oculus dashboard, hidden under a page called "Getting Started API". (Now's the time to create an app page for your app yet, if you haven't already.)
2. Use an Alpha release channel
Up to this point, I had been building directly to the device from Unity, with other testers side-loading the app via adb install. The app in this case appears in the "Unknown Sources" list in the Library on the Go. That was simple and worked great. Unfortunately, the Platform SDK is completely unusable to side-loaded apps; attempts to initialize it will return errors like ExternalPlatformLocal: AppID found in Library does NOT match the appID in the bundle and OVRService: com.oculus.horizon.service.ExternalPlatformLocal$PackageNotInLibraryException: Package com.technospirits.quivr not in users library.
The only way to make it work is to get the app officially into your library via the Oculus Store. This requires a few sub-steps:
Make sure you have an Android manifest file.
Use the Tools > Oculus > Create AndroidManifest.xml file to do this for you.Create a keystore and key for signing the app.
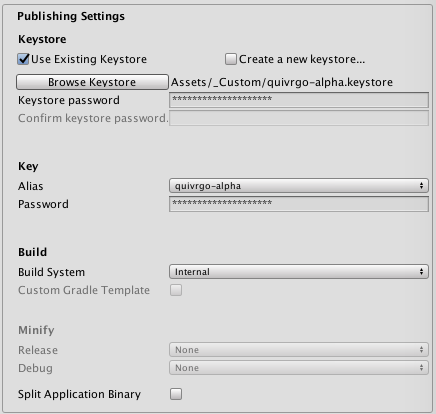
I tried to use this via the keytool included in the Java SDK, but it didn't work (apparently the format doesn't match what Unity expects). In the end it was easier to just let Unity do it. Go to the Publishing Settings section of the player settings. Check "Create a new keystore..." and fill in a keystore password (twice). Then use the Browse Keystore button to tell Unity where to save it (which should be somewhere in your Assets hierarchy).
Then use the pop-up menu in the Key section to create a new key. Give it a password for that as well. (You can use the same password as for the keystore itself if you like.)
Finally, reports on the interwebs claim that the Gradle build system doesn't sign correctly. I don't know whether this true, but since I had no reason to care, I switched over to the Internal build system.
The final Publishing Settings box should look something like this.
Check your app version and bundle code.
You'll be uploading a lot of "alpha" builds over the course of development, and each one needs to have an incremented version or bundle version code. Moreover, Oculus appears to use only the first two parts of your version string, so "0.1.1" and "0.1.2" are considered equivalent. You'll need to increment the Bundle Version Code instead. So take a moment to make sure these are set to suitably low values (found under Other Settings in the Player settings).

After all that, you should be ready to build and upload to the alpha channel. (Note that this page makes it sound worse than it is; in the alpha channel, you can skip most of the details that are required for a final submission, and there is no app review process.)
3. Invite testers (including yourself) to get the app.
On your app page, if you click the "..." button next to the alpha channel, you'll find a Manage Users command. From there you can enter the email address of yourself and any testers you want to invite. These must be the email address used with the Oculus Go (found at the top of the Settings page in the Oculus Go phone app).
Testers will receive an invitation to your alpha channel, which they accept by clicking a link. After that, the app will appear in Oculus Home on the device (for me it was in a section called "Oculus Recommends"), and they can download the app from there.
Note that you/they might want to uninstall the old side-loaded app first using adb uninstall. I'm not sure that's strictly necessary, but it's what I did anyway.
Thankfully, as the developer, you should only have to upload and download the app this way once. Thereafter, you can build directly to the device, and the Platform SDK will still work, because Oculus remembers that this is an official app.
3. Actually use the SDK.
Once you've jumped through all the above hoops, you're ready to (finally!) start using the Platform SDK. This is a little more awkward than you might expect, because all the calls are asynchronous — you make a request, and sometimes later, a completion callback is invoked.
To get you started, here's a script I used to get the Oculus username. There are two Platform SDK requests here: Entitlements.IsUserEntitledToApplication, and Users.GetLoggedInUser.
using System.Collections;
using System.Collections.Generic;
using UnityEngine;
using Oculus.Platform;

public class PlatformSDKIntegration : MonoBehaviour {

	public static string username { get; private set; }

	protected void Start() {
#if !UNITY_EDITOR
		username = "Pending...";

		// Start up the Platform SDK.  We don't specify the App ID here,
		// so it'll use (without complaint) the one set in the scriptable
		// object accessed via the Oculus Platform menu.
		Core.AsyncInitialize();

		// Check entitlements (required)
		Entitlements.IsUserEntitledToApplication().OnComplete(EntitlementCallback);
#else
		username = "UNITY_EDITOR";
#endif
	}

	void EntitlementCallback(Message msg) {
		if (msg.IsError) {
			Debug.LogError("Oculus Platform entitlement error: " + msg.GetError());
		} else {
			Debug.Log("Oculus Platform entitlement success! " + msg);
			Users.GetLoggedInUser().OnComplete(m => {
				if (!m.IsError && m.Type == Message.MessageType.User_GetLoggedInUser) {
					username = m.GetUser().OculusID;
					Debug.Log("Got Oculus username: " + username);
				}
			});
		}
	}
}
Each request call returns a Request object, on which you call the OnComplete method with the callback you want to run when the request is finished. This being C#, you can either pass in the name of a method to invoke (like EntitlementCallback above), or use a lambda expression (as we did with GetLoggedInUser above).
In either case, the parameter is always a Message object. You should check IsError on this, to see if the request completed successfully. You can also check Type, if you're paranoid, though for most requests you will always get back a type that corresponds to the request made. Note that this is not "type" in the C# sense; there are no subclasses of Message. Instead you have to know which accessor to call to get the actual data you want; in the case of GetLoggedInUser, you call GetUser() on the message to get that data.
How do you know what to expect? Unfortunately the docs for the Unity version of the SDK are pretty much nonexistent. But the Unity SDK is just a thin wrapper around the LibOVRPlatform C library. So you can use the LibOVRPlatform reference, in combination with poking around in the C# wrapper code, to figure out what to do.